

Working With Symmetry
1. Go to Create panel > Standard Primitive > Plane, set the Lenght for example = 2.1 cm and width= 2.4 cm also set Lenght segments = 2 and width Segments =2, and then Right Click > Convert To Editable Poly

2.Go to Modify Panel > Editable Poly > Vertex Selection > Move

3.Go to Modify Panel > Editable Poly > Edge Selection > Extrude Edges ( Click some edges + press "Shift" on your Keyboard + Move )

4. Go to Modify Panel > Editable Poly > Vertex Selection > Cut ( adding more lines )

5.Go to Modify Panel > Editable Poly > Edge Selection > Extrude Edges ( Click some edges + press "Shift" on your Keyboard + Move )

6.Go to Modify Panel > Editable Poly > Vertex Selection > Select Vertex > Remove unnecessary vertex

7. Extrude Edge ( see step 3 and 5 above )

8. Continue Step 7, Extrude some Edges, added new lines with "Cut" and Remove unnecessary vertex.

9. Congratulation, your Basic Shape is done !

10. Go to Create panel > Standard Primitive > Plane, set the Lenght for example = 31.9 cm and width= 31.9 cm also set Lenght segments = 2 and width Segments =2 ( this is tool to align the object pivot )

11. Select Plane > Right Click > Convert To Editable Poly > Go to Modify Panel > Editable Poly > Vertex selection > Select 2 vertex > Connect.

12. Select the object (place the object in the right hand corner, see the picture below)> Go to Hierarchy panel > Pivot > Affect Pivot Only > align the carving pivot to the center of Plane use the 2.5 snap.

13. Select object > Modifier list > "Symmetry" > select "Y" for the mirror axis

14. Select object > Go to Modify Panel > Symmetry > Mirror > Rotate the axis -45 degree

15. Add new Symmetry > select "X" for the mirror axis.

16. Add one more Symmetry > select "Y" for the mirror axis.

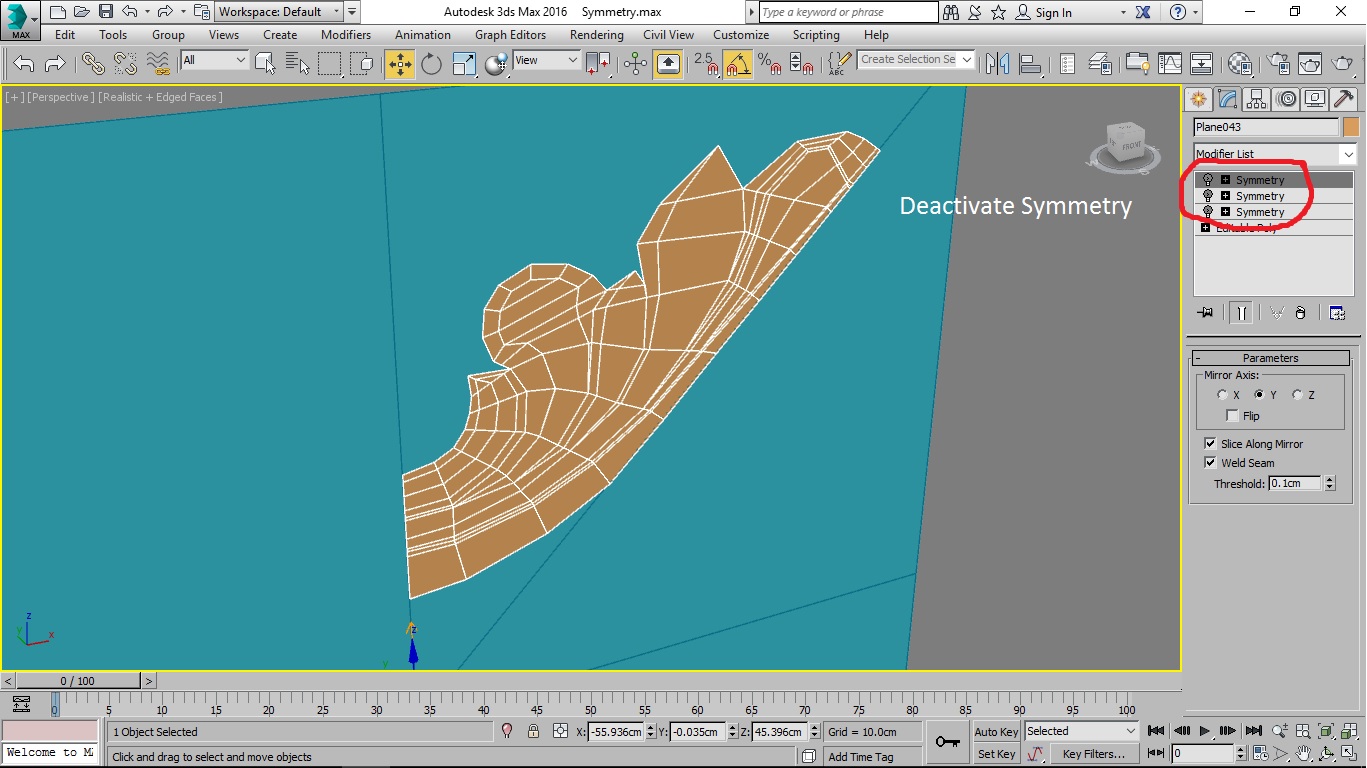
17. Now you can Deactivate the Symmetry modifier, then continue doing the carving detail.
18. Go to Modify Panel > Edge Selection >Select some Edges > Pull

19.Go to Modify Panel > Editable Poly > Edge Selection > Extrude Edges ( Click some edges + press "Shift" on your Keyboard + Move )

20. Continue step 19 > Extrude Edge + Remove unnecessary vertex. Congratulation, your Low Poly model is done !

21. Go to Modify Panel > Editable Poly > Subdivision Surface > activate "Use Nurms Subdivision" set the iterations = 2 or more to get the smooth result. also you can do with "Mesh smooth, Turbo Smooth, or Open Subdiv Modifier"

22. Select object > Go to Modify Panel > activate the first Symmetry

23. Select object > Go to Modify Panel > activate the second Symmetry

24. Select object > Go to Modify Panel > activate the last Symmetry, Congratulation ! Finally your model is done.

25. Clay Mode

SUSES Mas, Terus Bekarya
ReplyDeleteTerima Kasih mas
Deletekeren... software pake apa mas..?mohon infonya
ReplyDeletepakai 3ds Max mas, itu saya tulis judul blognya 3Ds Max modeling tutorial hehe
Deletekeren,indahnya berbagi ya gan
ReplyDeleteLaser engraving can improve the efficiency of engraving, make the surface smooth and smooth, rapidly reduce the temperature of the carved non-metal materials, and reduce the deformation and internal stress of the carved objects. It can be widely used in the field of a fine carving of various non-materials.
ReplyDeleteCNC Cutting Cutter Machine Engraving Machine for Carved Wooden Furniture
https://amzn.to/3hlQRih